The UTP cable is the type of cable that is used more frequently on Ethernet Networks and Telephone Networks, it's also the most common used type of cable for Computing Networking. Usually it's used for networks of medium and short distances, it is also the most common one because of its low prices compared to other types of cable (Like Coaxial Cable or Fiber Optic Cable). In Computing, these cables are more commonly used for conneting a computer to a network or to the internet (By using a Modem or other devices, like a Switch)
To make a Network Cable you need the following materials:
> UTP Cable

> RJ-45 Connectors

> Crimp Tool

> RJ45 Tester

Doing a Network Cable
The most common standards for doing a Network Cable are:
> Standard 568A
> Standard 568B
> Crossover
Cable with a 548A Standard
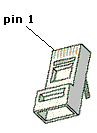
To do this type of cable we have to place the lines of the cable in the correct order, from 1 to 8 in the RJ-45 Connector (The image shows which pin of the RJ-45 Connector is the Pin #1)
The cables lines have to go in the order that the image bellows shows, when the cables are already placed in the correct order, with the Crimp Tool we have to do a bit of pressure in the RJ-45 Connector until it does a little *crack* sound, when it does the sound we have to check that the cable is steady in its position.

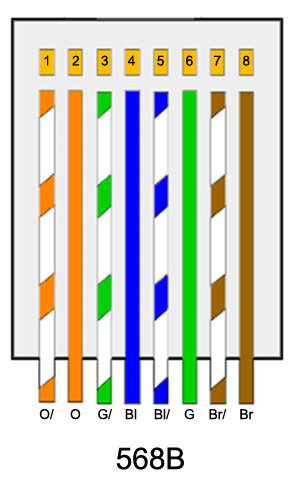
Cable with a 568B Standard
In this standard both sides of the cable have to go in the following pattern, after putting them correctly (Like in the 568A Standard) we have to pressure the RJ-45 with the Crimp Tool until it's steady, remember to always check if the lines of the cable are correctly placed before crimping it.
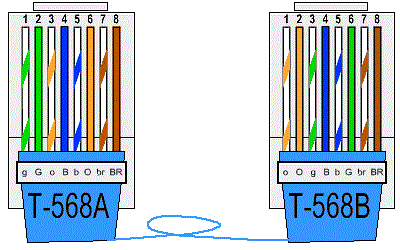
Cable with a Crossover Standard
In this standard both ends of the cable have to go like in the image below, it's also the only type of cable with different ends (That's why it's called a "Crossed" cable, meanwhile the other ones are known as "Straight" cables)
Like the other 2 types of Standards, after putting the cable lines in the correct order and checking that they're placed correctly, we have to apply pressure with the Crimp Tool until they are steady.
Now, after makint any of the types of cables explained before, we have to check if they are correctly made by using the tester, we place both sides of the cable in the connectors of the tester and if all the lights flashes in a green color, it means that they're all fine, but if a light flahes in a red color, it means that the line of the cable that goes into the pins that the tester indicates are wrongly placed.
No hay comentarios:
Publicar un comentario